


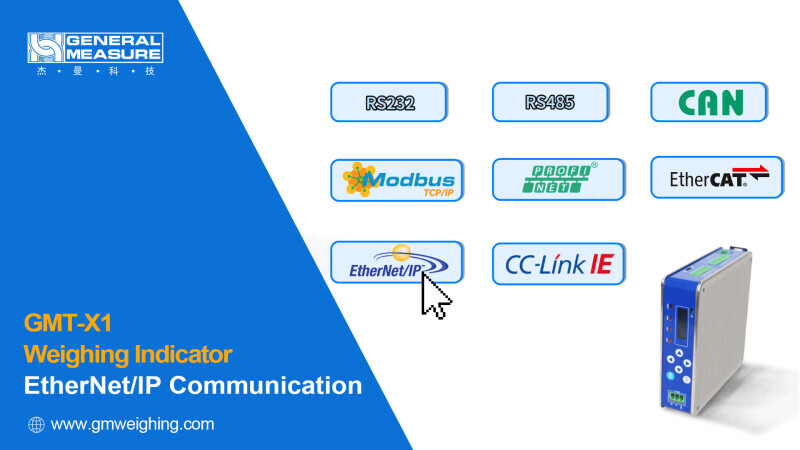
General Measure Technology Co. Ltd. (China) - Press Release: Weighing Indicator GMT-X1 Communication with an Omron PLC via EtherNet/IP
The GMT-X1 supports multiple communication methods, including Serial Communication, CAN Communication, Ethernet Communication (Modbus TCP/IP), and Fieldbus Communication (including Profinet, EtherCAT, Ethernet/IP, and CC-Link IEFB).
In this video, we will demonstrate how the GMT-X1 communicates with an Omron PLC via EtherNet/IP.
Before communication, you need to download the GMT-X1 description file (EDS file) from the GM website: www.gmweighing.com “GMT-X1_EDS File.”
In this demonstration:
The software used is CX-Programmer (PC IP: 192.168.101.25)
PLC model: CJ2M CPU33 (IP: 192.168.101.2)
Instrument: GMT-X1 (IP: 192.168.101.10)
The 448X parameters of the instrument menu use the default Lite version settings
The EDS file used is the corresponding Lite version: GMT-XONE_Lite(CH)_20250319.EDS
1. Create a New Project
Open CX-Programmer, click [New], and enter a device name, for example, NewPLC1.
Select CJ2M as the device type (according to your PLC), then click [Settings], select CPU33 as the CPU type, and click [OK].
For Network Type, select EtherNet/IP, click [Settings], and enter the actual PLC IP address, for example, 192.168.101.2, then click [OK].
After completing all selections, click [OK] to finish creating the new project.
2. Transfer the PLC IO Address Table
Click [Work Online], and click [Yes] in the pop-up window.
After the PLC goes online, click [Program Mode] to stop the PLC.
Double-click [IO Table and Unit Setup].
In the PLC IO Table window, click [Options] → [Create] → [Yes] → [Yes] → [Transfer].
Wait until the transfer is completed, then click [OK].
3. Add the Routing Table
In the PLC IO Table window, expand [Built-in Port].
Right-click Unit 0, select [Start Special Application] → [Start Only], then select CX-Integrator, and click [OK].
After entering CX-Integrator: Click [Communication Settings]
Device Type: CJ2M, Click [Settings], CPU Type: CPU33, then click [OK]
Network Type: Ethernet
Click [Settings] → [Driver]
Set the actual PLC address (e.g., 192.168.101.2)
Click [OK] → [OK]
Then click [Work Online] → [Start Routing Table].
In the new PLC Routing Table window:
Right-click Unit 0, select [Insert CPU SIOU] → [OK] → [Yes].
Then click [Transfer to PLC] → [Yes] → [OK].
The routing table configuration is complete. You can now close CX-Integrator.
4. Network Configuration
4.1 Open Network Configurator
Return to the PLC IO Table window, right-click Unit 0 again, select
[Start Special Application] → [Start Only],
Then select Network Configurator in the pop-up window and click [OK].
4.2 Online Connection
In the Network Configurator window:
Click [Option] → [Select Interface] → [Ethernet I/F], and ensure Ethernet I/F is selected.
Then click [Connect].
Select the network adapter corresponding to the IP segment and click [OK].
Select TCP:2, click [OK], then select Ethernet/IP_1, and click [OK] to complete the connection.
4.3 Load the EDS File
Click [Install EDS].
Locate and select the prepared Lite version EDS file:
GMT-XONE_Lite(CH)_20250319.EDS
Click [Open] to complete the EDS installation.
4.4 Network Node Configuration
In the Hardware List on the left side, find CJ2M-EIP21 and GMT-Xone, and double-click them.
The PLC and instrument nodes will appear on the right.
Right-click GMT-Xone, select [Change Node Address],
Set New IP Address to 192.168.101.10, then click [OK].
Then right-click the PLC node, select [Change Node Address],
Set New IP Address to 192.168.101.2, then click [OK].
This completes the network node configuration.
4.5 Create Associated Memory
Double-click the PLC node, click [Tag Sets], then click [Edit Tags].
In In-Consume, click [New]:
Name: D100 (corresponding to the instrument input start address)
Size: 20 (10 words = 20 bytes)
Click [Register], then [Close].
In Out-Consume, click [New]:
Name: D200 (corresponding to the instrument output start address)
Size: 16 (8 words = 16 bytes)
Click [Register], then [Close].
Click [OK] → [Yes].
Next, click [Connections], click the Register icon, and double-click GMT-XONE.
For Input Tag Set and Output Tag Set, select D100 and D200 respectively from the dropdown list.
Click [Register], then [Close].
After registration, the Register Device List will display the IO memory addresses corresponding to the instrument.
Click [OK].
4.6 Download Network Configuration
In Network Configurator, click:
[Download to Network] → [Yes] → [Yes]
Wait until the download progress completes, then click [OK].
Then the overall network configuration and download is finished.
5. Read Cyclic Data
Return to the CX-Programmer window.
Click [View] → [Windows] → [Watch].
In the Sheet1 window, double-click an empty row:
Address: D100
Data Type: REAL
Click [OK].
When the PLC is online, you can see the current weight value of the instrument (floating-point format).
Other data read/write operations can be configured by creating symbolic variables according to the IO address table provided in the instrument manual.
That's all for demonstrating the communication between GMT-X1 and Omron PLC.
If you would like to learn more about the detailed functions of this instrument, follow General Measure.
Watch the video.


Interested? Submit your enquiry using the form below:
Only available for registered users. Sign In to your account or register here.